Table of Contents
Mouse
 Drag in the center of the viewport. This will orbit the object. Drag in the edge of the viewport. This will roll the camera. + Ctrl: Drag and this will orbit the light source.
  Drag and this will dolly the Camera Forwards and Backwards. + Shift: Drag and this will Pan the camera Up/Down/Left/Right.
Keyboard Shortcuts
Note: These may not be available in all versions.
F5: Refresh the currently loaded model.
F9: Static Cloth
R: Reload Cloth
C: Simulate Cloth
Ctrl + A: Toogle Attachments
Ctrl + O: Toggle Bones
Ctrl + N: Toggle Normals
Ctrl + T: Toggle Tangents
Ctrl + W: Toggle Wireframe on shaded
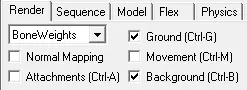
Ctrl + G: Toogle Ground
Ctrl + M: Toggle Movement
Ctrl + B: Toggle Background
Ctrl + H: Toggle Hitboxes
Ctrl + S: Toggle Shadow
Ctrl + D: Toggle Displacement
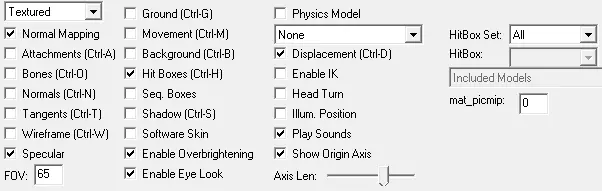
- Drop Down Box:
- Wireframe: Preview a model in wireframe mode.
- Smoothshaded: Doesn’t appear to function as one would expect. Same as textured.
- Textured: This gives a fairly accurate account of what the model will look like in the engine.
- Bone Weights: Doesn’t appear to function in any useful way compared to a similar mode found in 3D modelling packages.
- Bad Vertex Data: This will show a red area of issue in your mesh where the engine has an issue with the mesh or UV’s
- UV Chart: Displays the UV Map associated with the loaded model. If more than one model is used switch the material used under the Model tab to view its UV Data. Note: Not available in all versions.
- Co-LocatedVerts: Preview Vertices that overlap or live in the same (or close to) point in space. Note: Not available in all versions.
- Normal Map: Display the Normal Map of the loaded model. Note: Not available in all versions.
- NormalMap++: Display the Normal Map with what seems to be a gradient mask. Note: Not available in all versions.
- Value: Seems to display a specular channel. Note: Not available in all versions.
- Silhouette: Display the model as a silhouette. Note: Not available in all versions.
- Normal Mapping: This will display the normal/bump mapping on top of your textured model, providing the illusion of more detail and depth in your model.
- Attachments: This displays a small XYZ handle at each location on a model where an attachment can be located.
- Bones: This will highlight the models skeletal rig (if one exists).
- Normals: This will show the vertex normals of the mesh and the direction they point in.
- Tangents: This will preview the tangent data/positions within the mesh.
- Wireframe: Provides a wireframe on shaded view granted that you have textured or smoothshaded rendering selected.
- Specular: This will show a models specular map added to the model (if one exists).
- FOV: Defaulting to 65 the field of view controls the angle of width that you can view models from a first person perspective.
- Ground: Shows a textured plane (that scrolls when the model walks).
- Movement: This will provide a box encapsulating the model. Once a model begins to move or walk a lighter colored box will trail behind depicting the path of the character.
- Background: This will render a background image in the distance much like a skybox.
- Hitboxes: Hitboxes are individual boxes which encapsulate important sections of a model. They are used to register being shot or damaged in some way. Hitboxes values vary depending on what part of a model they represent.
- Sequence Box: A sequence box is a bounding area covering the whole area an animation will affect.
- Shadows: This will project a top down shadow onto the ground if it’s enabled.
- Software skin: Checking this disables any flex operations you may want to view on a model.
- Enable Overbrightening: This will increase the brightness of a model in the viewport.
- Enable Eye Look: Forces Character eyes to follow camera. Note: Not available in all versions.
- Physics Model and Dropdown box: Enable this to preview your mesh physics proxy. You can select an individual portion of the proxy in order to inspect it.
- Enable IK: This will render on the ground small boxes to show inverse kinematics in action. You must have a sequence running in order to see these boxes.
- Head Turn: Will force a character models head to face the camera.
- Illum. Position: Shows an axis handle to mark the illumination root of the model. When illuminating an animated or moving model in the engine, the lighting calculations are only done for the two brightest light sources. All the other lights, as well as bounced light from the environment, go into a simple single cubemap. This is the position the model uses for that cubemap.
- Play Sounds: This will play sounds if any are associated with an animation.
- Show Origin Axis: Display the Axis handles in the viewer. Note: Not available in all versions.
- Axis Len: This allows you to adjust the length of the axis handles. Note: Not available in all versions.
- HitBox Set: Select a Hitbox set associated with the loaded model. Note: Not available in all versions.
- HitBox: Select a Hitbox from a Hitbox set. Note: Not available in all versions.
- Dropdown Box: Lists all models the .QC references. Note: Not available in all versions.
- Matpic_mip: Set the mipmap level of an image, this directly affects the quality of an image. Note: Not available in all versions.

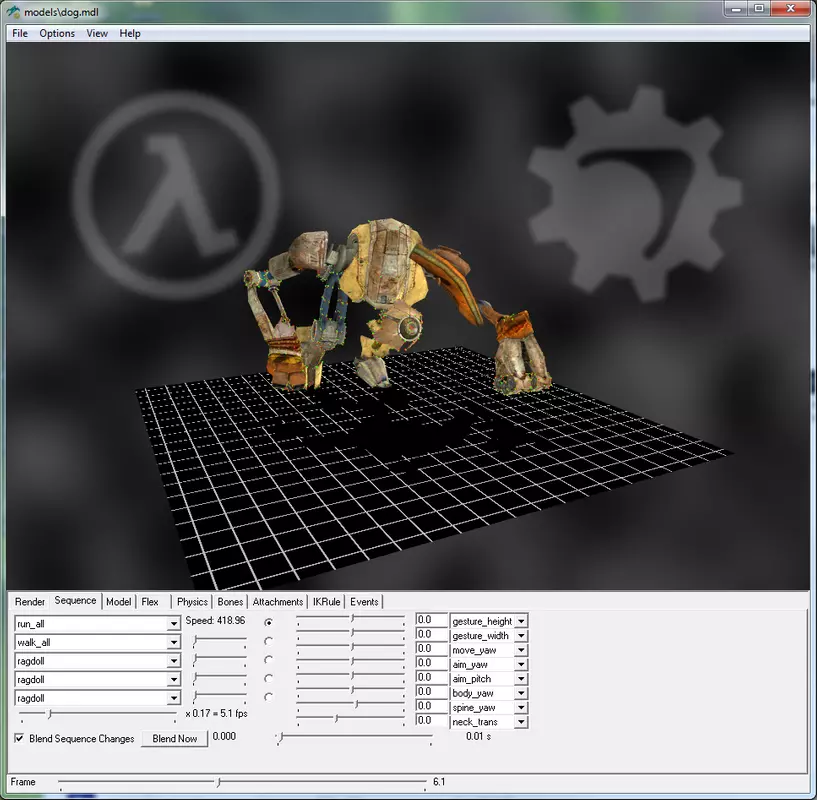
This is what the Sequence tab looks like. The sections are color coded to aid in their description
- Red – This is the sequence tab that stacks animations on top of each other starting with the top and moving down. It is very useful when viewing or debugging how a set of animations will blend in the engine.
- Blue – These sliders are used to activate a blend from the previous animation to the next animation in the list.
- Teal – Their purpose is unclear (If you are aware of their purpose please let me know so I can update this document)
- Green – This slider allows you to control the speed at which the sequence plays.
- Yellow – Blend Sequence Changes when checked will create a motion blend between each sequence selected in the list. If unchecked you can observe a hard switch. The blend now button starts the blending operation once activated.
- Pink – This slider is in relation to the blending of animations also. When fully to the left (0 sec) and when blending 2 animations it will blend automatically whereas if the slider was full to the right (1 sec) or in-between it will add milliseconds to the time spent blending the animation. This can give for a more natural and organic Look depending on the animations in question.
- Orange – This lets you modify a bones orientation based on a sequence you have loaded. This means you can modify the direction or rotation the body faces or moves while it’s playing a base sequence.
- Brown – Filter sequences using strings. Note: Not available in all versions.
- Grey – Activity modifiers lets you switch out an activity if the model supports it. A checkbox for animate weapons allows you to animate weapons attached to your currently loaded model. Note: Not available in all versions.
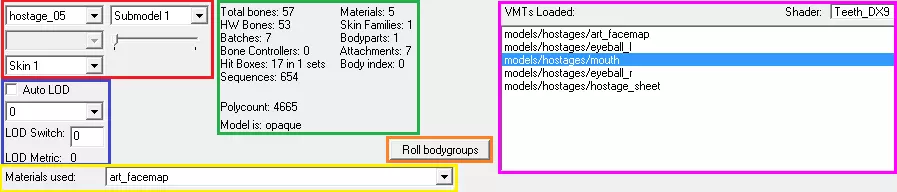
- Red – You can see that Hostage_05 is the selected model here. If it had any submodels they could be selected through a drop down. If the model had further skins you could select and view it.
- Blue – The Auto LOD allows the engine to control when to switch the mesh into a lower polygon version based on distance from the camera. From the drop down you can select and view a specific LOD. The LOD Switch is the value used to compute how far from the camera the model must be before an LOD is swapped in.
- Green – This section provides some general yet useful information on the loaded model.
- Pink – This section shows all the materials associated with the model as well as the shader used to render them.
- Orange – Roll Bodygroups lets you randomize the model bodygroup selections. Note: Not available in all versions.
- Yellow – Select a material to view, if UV Chart is select in the Render tab you can cycle through the Materials and UV’s. Note: Not available in all versions.
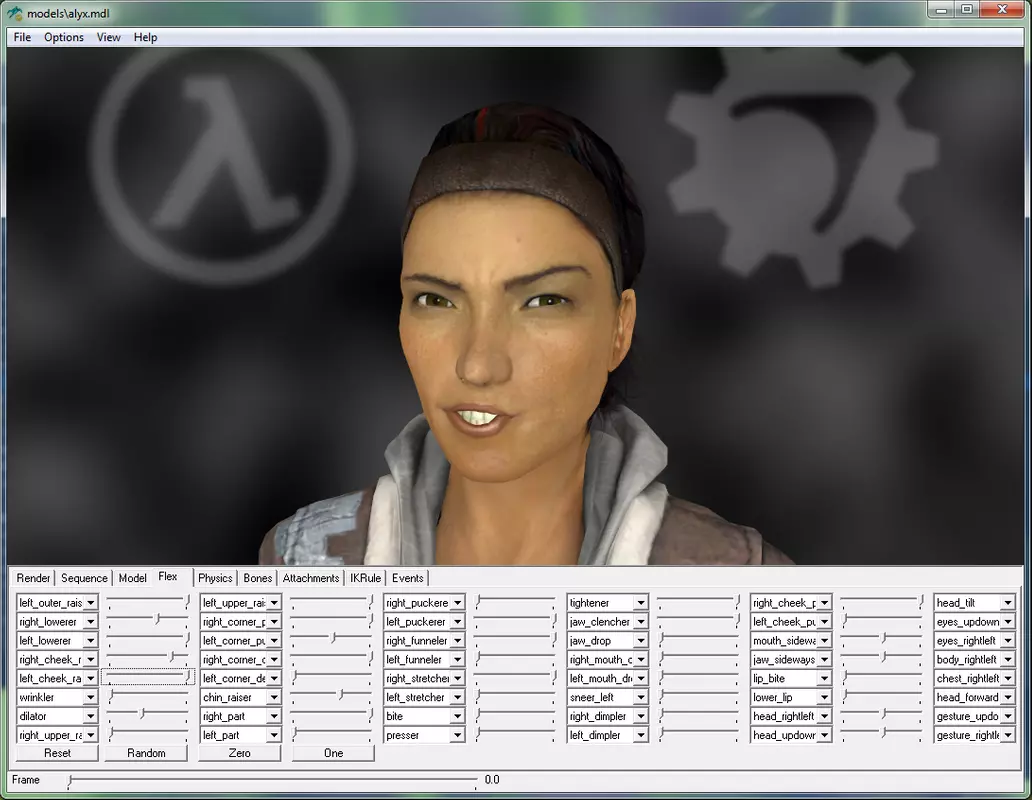
This tab for the most part is self-explanatory and replicates a set of tools available to you in Faceposer. These sliders will not function if software skin in the render tab is checked. You can manipulate the individual controls used to create facial expressions in a character.
- Dropdown Box: This lets you select a specific section of the collision/physics mesh.
- Mass: You can set the mass of the object/selection and use this to generate a .QC.
- Highlight: Highlights the selected part of the physics mesh.
- X Y Z: Select an axis to rotate the physics mesh around.
- Friction: Set a friction value from 0 – 1000.
- Min/Max: Define a range from -99 to 99.
- Test Slider: This will rotate the mesh on a given axis between the values determined by min/max.
- Link: Constrains Min and Max to move in equal amounts in the opposite directions.
- Generate QC: This will create QC code on your clipboard based on the settings you manipulated with the sliders.
- Mass Bias: Affect the mesh’s mass.
- Inertia: Affect the mesh’s inertia.
- Damping: Affect the models damping.
- Rot Damping: Affect the models rotational damping.
- Material: Depending on what bone you have selected from the Dropdown Box the Material can vary from many predefined materials such as flesh, wood, concrete etc.
- Bone Dropdown: This allows you to select a bone and view the hitbox associated with it.
- Highlight Bone: This will highlight the select bone when checked.
- Bone Surface Prop: Here you can change the surface type.
- Apply to Children: Selecting this will propagate any changes you make to a bone onto its children if any exist.
- Autogenerate Hitboxes: Greys out the majority of the right side. This adds nothing to the QC so this will auto generate hitboxes on compilation.
- Show Default Pose: Show the default Ragdoll pose.
- Hitbox Set: This lets you select between hitboxes which comes in very helpful when modifying existing hitboxes.
- Set Name: Name the selected hitbox Set.
- Add set: Create a new hitbox set with this (naming it is a good idea)
- Delete set: Delete a selected set.
- Hitbox: Provides the value of the hitbox group the currently selected bone belongs to.
- Highlight Hitbox: Highlight the currently selected bones hitbox.
- Hitbox Group: Change the group a hitbox belongs to.
- Hitbox Name: Name your hitboxes here.
- Hitbox Origin: Move a hitbox on the 3 axis. Note: Not available in all versions.
- Hitbox Size: Scale a hitbox. Note: Not available in all versions.
- Update Hitbox: Refresh the hitbox in the previewer.
- Generate QC: This generates all your manually added hitboxes or tweaks as text to the clipboard for you to add to a .qc file in order for you to compile the tweaked model. Note: all changes you make in the viewer won’t be visible until you recompile your model and reload it.
- Add Hitbox: This lets you generate your very own hitboxes to cover parts like wings or extra limbs on your custom models.
- Delete Hitbox: will delete the currently selected hitbox.
- Edit Hitbox: Select which hitbox to edit. Note: Not available in all versions.
- Load .HBX: Load in a saved hitbox. Note: Not available in all versions.
- Save .HBX: Save the current hitbox for use in other models. Note: Not available in all versions.
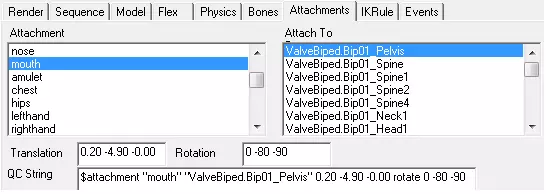
- Attachment: This lets you select from a collection of attachments currently attached to the loaded model.
- Attach To: This will highlight the bone that the currently selected attachment belongs to.
- Translation: This lets you move the selected attachment into a more suitable position if needed.
- Rotation: Modify the attachments orientation.
- QC String: This text will update once you make changes to the attachments. Paste this text into the correct section of the .qc file used to compile the model and recompile to bake in the settings you need.
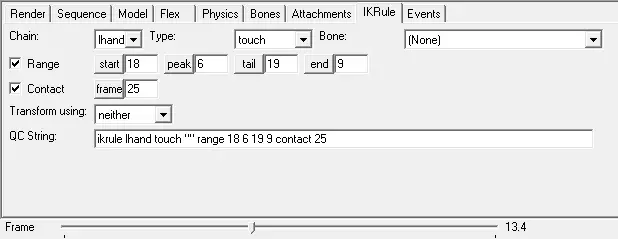
This section is used to inspect and modify the ikchain setup of your model by creating ikrules for scenarios such as walking or interacting with attachments.
- Chain: Select which ikChain to affect.
- Type: Select the type of ikrule you would like to work with.
- Range: Adds the values you put in the start, peak, tail and end fields to the QC String field.
- Contact: Adds the frame number you want the model to contact with something.
- Transform using: switch between source, sequence and neither.
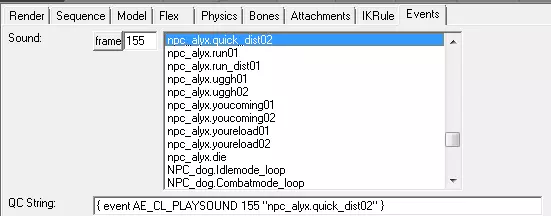
The events tab is used to create a QC string to play a sound at a specific frame in an animation.
- Frame: select this to generate the QC string based on your selection in the sound list.
- QC String: Use this text in your compilation for the model if you have a specific event the character must react to with sound.
- Activity List: Select from a group of activities. Note: Not available in all versions.
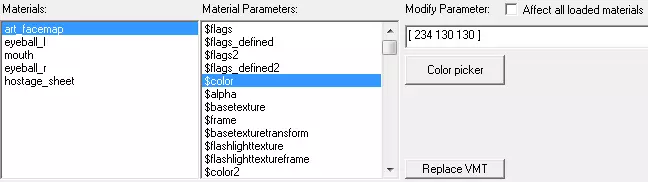
Tweak Model materials in this tab and save to .VMT. Note: The Materials Tab is not available in all versions of HLMV.
- Materials: Select the Material to edit
- Material Parameters: Select a Parameter to Edit.
- Modify Parameter: Change the value of the selected parameter. Depending on the type of value you could be give a float slider, textbox, color picker or transform matrix.
- Affect all loaded materials: self-explanatory.
- Replace VMT: save your changes to a material file.
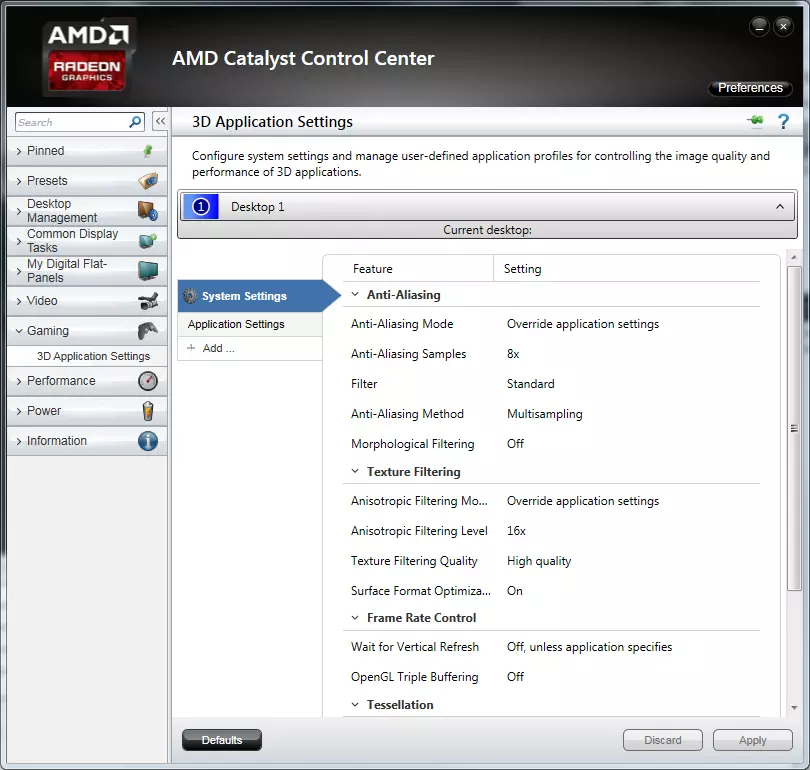
Tweaking the Anti-Aliasing of HLMV
For AMD/ATi cards you can get optimal anti-alias performance from your GPU by entering the Catalyst Control Center and under Gaming > 3D Application Settings set Anti-Aliasing Mode to [Override application settings] as well as setting [Anti-Aliasing Samples] to 8x. You can also bump to max all the Texture Filtering Settings by overriding the application settings and setting each following value. Of course it makes more sense to only add these settings to HLMV so create a profile using the Add button and make the necessary changes.
You can further increase the image quality on Radeon cards if you own a HD5*** or above by setting the Anti-Aliasing method to Super sampling. (It would be best to do this in an application profile.)
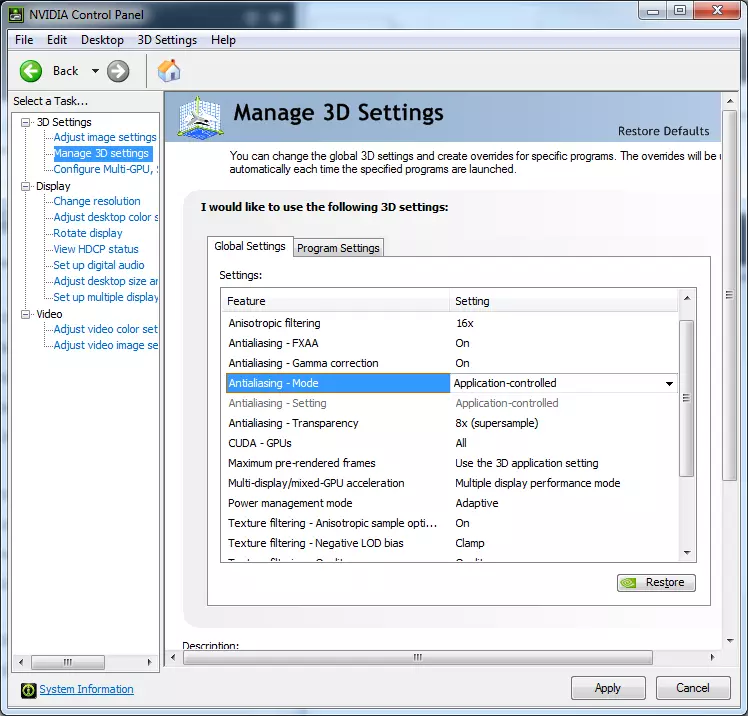
For Nvidia Card owners it’s much the same procedure. Open the Nvidia Control Panel and navigate to the section labelled [Manage 3D settings]. You can make the changes globally or to HLMV only. Either way the values you must add are [Antialiasing – Mode]: Application-controlled and then set each anti-aliasing and Texture Filtering related setting to the highest possible for your GPU.
Tweaking the Anti-Aliasing of HLMV
HLMV reads values in from a text file called dxsupport.cfg which you can find in the same location as HLMV. Open this up with your text editor of choice and you will be greeted with hundreds of lines of Cvars setting values to variables that HLMV can understand. There is a profile for almost all GPU’s on the planet bar maybe some of the newer ones.
HLMV reads values in from a text file called dxsupport.cfg which you can find in the same location as HLMV. Open this up with your text editor of choice and you will be greeted with hundreds of lines of Cvars setting values to variables that HLMV can understand. There is a profile for almost all GPU’s on the planet bar maybe some of the newer ones.
How to add custom Background and Ground materials
You can load custom materials into HLMV to replace the Background and Ground ( You can modify others also, simply search for what is available to change in GCFScape, depending on what game you wish to use the viewer for open the corresponding VPK i.e. hl2_textures_dir.vpk > materials > hlmv)
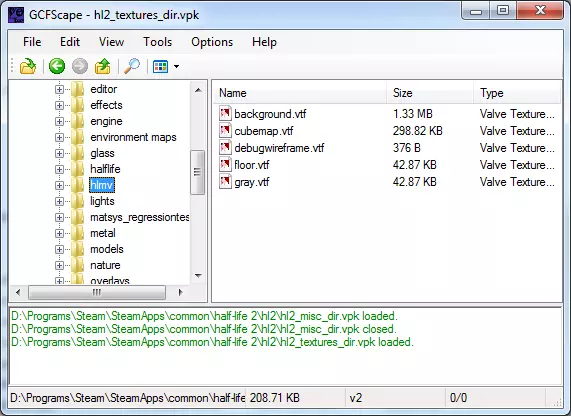
To add your own custom images you would first need to create them in an image editor of your choice and convert them to the VTF format. [A set is included with the accompanying project files]
Note: The stock background.vtf image is 512 * 512 and the ground.vtf is tiled @ 256 * 256
You will also need to locate or create VMT files for each texture. These can be found in the misc_dir VPK, i.e hl2_misc_dir.vpk

Place your custom files in the correct location to view the changes. For example:
Steam/Steamapps/common/half-life 2/hl2/custom/my custom files/materials/hlmvThen you simply need to press F5 and refresh HLMV you view your custom background and ground texture.
Note: Be sure to check Ground and Background on the render Tab.
Registry Hacks
HKEY_CURRENT_USER\Software\Valve\hlmvYou will see the following values for each model you have previously opened in HLMV. You can modify each in regedit but note that if you are modifying the values of the currently opened model HLMV will overwrite your changes, only modify if you have a separate model open and press F5 then re-open the model you modified in the registry and observe your changes. Otherwise simply close HLMV, make your changes and they will be set on opening HLMV next time.
Note: All values are relative to each model and not global settings for HLMV. Some of the values below delpend on which HLMV you are using.
| Value | Description | Type |
|---|---|---|
aColor | Vec4 | |
bgColor | Vec4 | |
cclanguageid | Integer | |
enablenormalmapping | Integer | |
gColor | Vec4 | |
lColor | Vec4 | |
lightrot | Vec3 | |
merge0 – merge3 | String | |
merge4 – merge12 | String | |
overlaySequence0 – overlaySequence3 | String | |
overlayWeight0 – overlayWeight3 | String | |
playsounds | Integer | |
Rot | Vec3 | |
sequence | String | |
showbackground | Integer | |
showground | Integer | |
showillumpos | Integer | |
showshadow | Integer | |
speechapiindex | Integer | |
speedscale | Integer | |
thumbnailsize | Integer | |
thumbnailsizeanim | Integer | |
Trans | Vec3 | |
viewermode | Integer | |
originaxislength | Integer | |
Showoriginaxis | Integer | |
enabledisplacementmapping | Integer |
Run the game first
It’s always a good idea to run the game you wish to view the models of first. The reason for this is that the engine will extract some files from the VPK’s that the viewer uses to load models correctly.
Running HLMV from the Source SDK Fails
It’s always a good idea to run the game you wish to view the models of first. The reason for this is that the engine will extract some files from the VPK’s that the viewer uses to load models correctly.
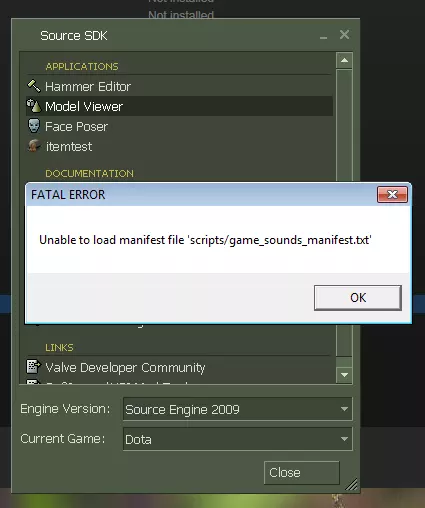
This does not seem to be an error that can be fixed; it arose ever since the SDK was ported to the steam pipe distribution system. The Source SDK is still important though, If you have trouble loading models through File > Load Model (Steam) and your positive your VPROJECT environment variable is set correctly you can Set the Engine version and Current game you wish view models for (you can create a game configuration if it doesn’t exist) Then restart the SDK, load HLMV from the games Bin Directory. For example:
C:\Program Files\Steam\SteamApps\common\half-life 2\bin\hlmv.exe(Steam) Load model Error
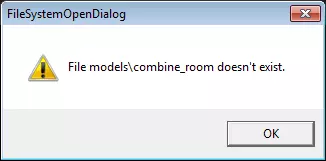
This might be the most infuriating problem with HLMV and is caused when you try to open a model from a VPK which doesn’t have an empty folder created in the models folder on your hard disk. Simply create the folder structure of the model you are trying to view. For the error above I would need to create this folder to be able to view its contents.
Unable to find gameinfo.txt
This error occurs when you attempt to load a HLMV when the correct environment has not yet been setup.
The variable is VPROJECT and it should point to the content folder of the game you wish to view models for. In the case of Half-Life 2 it would be something like this:
VPROJECT=C:\Programs\Steam\SteamApps\common\half-life 2\hl2\You can check what VPROJECT is currently set to by typing the following in Command Prompt
set VPROJECTThis will return its current value.
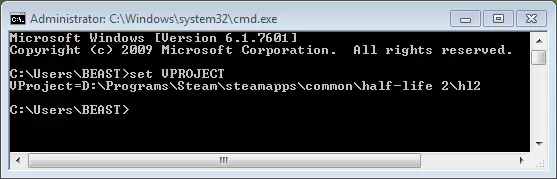
You can also set the variable using the same command and it would look something like this:
set VPROJECT=C:\Programs\Steam\SteamApps\common\half-life 2\hl2\Note: This may not work for some people for reasons I am not quite sure of yet.
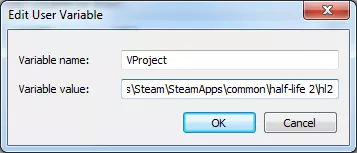
Occasionally the VPROJECT path you set above does not update in the Environment Variables section.
Type Environment Variables into start and select “Edit environment variables for your account”. In the screen you are presented with you should see in the User Variable Section an Entry for VPROJECT.
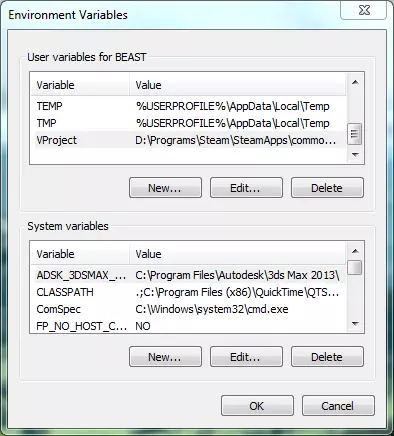
Open it to edit it. If it doesn’t exist create it. This will set the Environment Variable.
Desktop Shortcut
Another useful method of avoiding the “Unable to find gameinfo.txt” issue is to create a shortcut to HLMV in the following manner.
Thanks to ZeqMacaw for providing this.
- Create a shortcut to “hlmv.exe” found (by default) in “C:\Program Files\Steam\steamapps\common\left 4 dead 2\bin\”.
- Right-click on the shortcut.
- Select Properties.
- Select the Shortcut tab (if not already shown).
- Delete all text in the Target field.
- Copy-paste into the Target field: “C:\Program Files (x86)\Steam\steamapps\common\left 4 dead 2\bin\hlmv.exe” -game “C:\Program Files (x86)\Steam\steamapps\common\left 4 dead 2\left4dead2” (If not using the default folder for Steam, then edit the Target field as needed. It should be similar to the Start in field.)
- Move the shortcut to a easily-accessible folder, such as a taskbar toolbar; it should be placed somewhere for convenient opening.